How to Fold a Fitted Sheet: Complete Step-by-Step Guide
Master the art of folding fitted sheets with our easy-to-follow guide. Learn the corner-tucking method and expert tips for perfect folds every time.
Turn the sheet inside out first to identify corners easily
Tuck adjacent corners into each other to create pockets
Smooth out wrinkles after each fold for a neat result
Practice on a flat surface for best results
Folding a fitted sheet can be frustrating, but with the right technique, you can achieve neat, uniform folds every time. The key is understanding how to handle the elastic corners, which is what makes fitted sheets different from regular flat sheets. This guide will walk you through the corner-tucking method, the most effective way to fold fitted sheets.
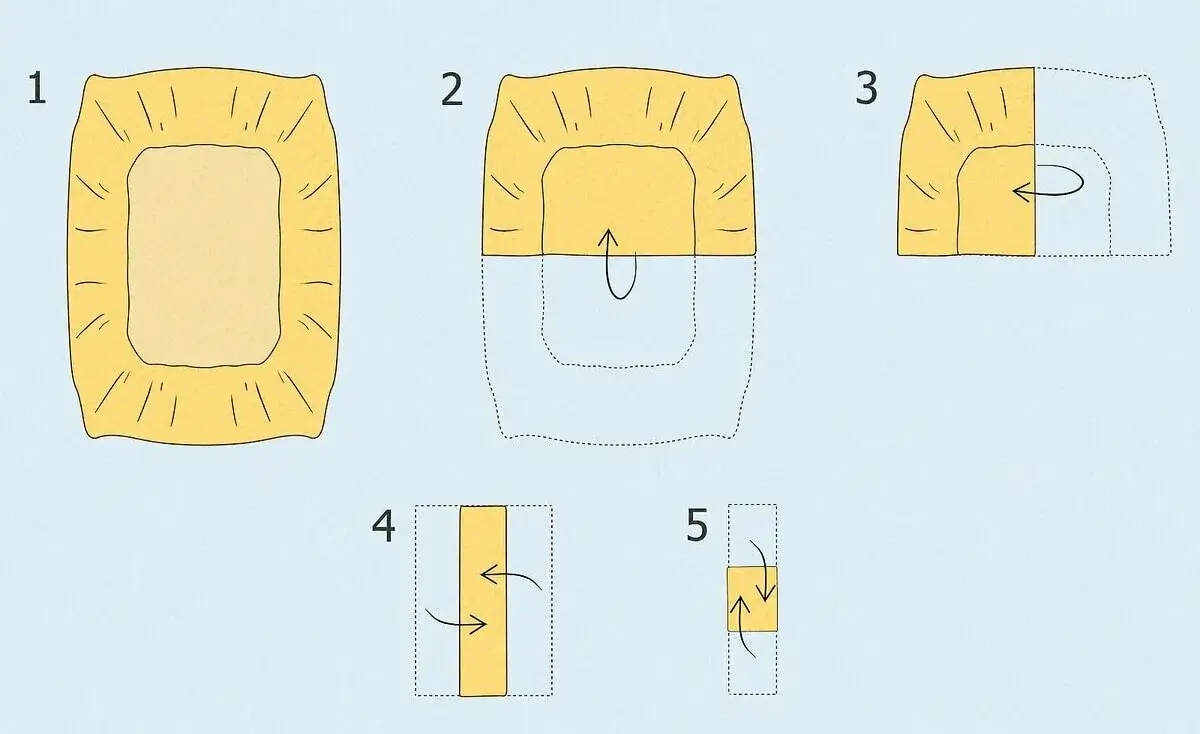
Step-by-Step Folding Instructions
Start by turning the fitted sheet inside out so the elastic edges are on the outside. This makes it much easier to see and identify the corners. The elastic should be visible around all four edges.
Tip: If the sheet is still damp from washing, let it dry completely first. Damp sheets are harder to fold and may develop wrinkles.
Hold the sheet with both hands, grasping two adjacent corners (one in each hand). Make sure you're holding the corners that are connected by the same edge. You should be able to see the elastic edge between your hands.
Tip: Stand in front of a flat surface like a bed or table. This gives you a reference point and makes the folding process easier.
Bring your hands together and tuck one corner into the other, so the elastic edges are nested together. This creates a pocket. The two corners should now be inside each other, with the elastic edges aligned.
Tip: Make sure the corners are fully nested. If they're not, the fold won't be as neat, and the elastic edges may stick out.
Take the remaining two corners and tuck them into each other in the same way, creating a second pocket. You should now have two pairs of nested corners, which makes the sheet much easier to handle.
Tip: At this point, the sheet should look more manageable. The elastic edges are contained, and you're working with a more rectangular shape.
Lay the sheet flat on a clean surface and fold it in half lengthwise (bringing the long edges together). Then fold it in half again to create a neat rectangle. Smooth out any wrinkles as you fold, taking care to align the edges.
Tip: Smooth the sheet with your hands after each fold. This prevents wrinkles and ensures a neat, professional-looking result.
Make a final fold to create a compact square or rectangle that fits neatly in your linen closet. The sheet should now be uniform and easy to stack with other folded sheets. Aim for a size that's consistent with your other linens.
Tip: The final size should be approximately 12-14 inches wide and 14-16 inches long, depending on your sheet size. This creates a uniform stack in your closet.
Common Folding Challenges & Solutions
Solution: Make sure you fully tuck the corners into each other in steps 3 and 4. The elastic edges should be completely nested. If they still stick out, try turning the sheet inside out more carefully and ensuring the corners are fully aligned before tucking.
Solution: This usually happens when the sheet is too large or the folds aren't tight enough. Try making smaller, tighter folds. You can also fold it one more time to create a more compact size that stays in place better.
Solution: Smooth the sheet after each fold with your hands. Make sure the sheet is completely dry before folding. If wrinkles persist, try folding on a flat, clean surface and take your time to align the edges properly.
Solution: The corner-tucking method works for all fitted sheet sizes (twin, full, queen, king, California king). The process is the same, but larger sheets will result in larger folded rectangles. Adjust your final folds to match your storage space.
Expert Tips for Perfect Folds
Fold When Dry
Always fold fitted sheets when they're completely dry. Damp sheets are harder to fold and will develop wrinkles and creases that are difficult to remove later.
Use a Flat Surface
Fold on a clean, flat surface like a bed or table. This gives you a reference point and makes it easier to align edges and create uniform folds.
Smooth as You Go
Smooth out wrinkles after each fold. Run your hands over the sheet to remove any bumps or creases before making the next fold.
Practice Makes Perfect
Don't get discouraged if your first few attempts aren't perfect. The corner-tucking method takes practice, but once you master it, you'll be able to fold fitted sheets quickly and neatly.
Frequently Asked Questions
Related Guides & Tools
Bed Sheet Size Chart
Complete size chart with fitted and flat sheet dimensions for all bed sizes.
Bed Sheet Selection Guide
Complete guide to choosing bed sheets based on mattress type and needs.
Bed Sheet Material Comparison
Compare cotton, microfiber, bamboo, linen, and polyester sheets.
Blanket Size Chart
Standard blanket sizes for beds and special purposes.